Visualizzazione post con etichetta Audrey style. Mostra tutti i post

martedì 13 settembre 2011

idee per un matrimonio a tema: Colazione da Tiffany

la mia torta nuziale

come ho già scritto in precedenza quando mi sono sposata ho voluto realizzare un matrimonio a tema... ovviamente: Colazione da Tiffany!!!
quella che vedete qui sopra è la partecipazione\invito alle mie nozze; ci siamo fatti fare questa foto in studio e poi magicamente con fotoshop siamo "finiti" davanti al negozio di Tiffany a N.Y. (dal momento che non abbiamo ancora avuto l'occasione di andarci di persona!!!)
sul retro della fotografia c'è stampato tutto il testo della partecipazione.
E' stato un piacere scoprire che  molti dei nostri invitati hanno conservato il nostro invito: c'è chi ci tiene in cornice, chi ci ha attaccato con la calamita al frigo, chi ci ha messo tra le foto più care in camera da letto o chi ci conserva tra le pagine di un libro.

due care amiche in perfetto Audrey style per festeggiare il mio giorno più bello

vi lancio qualche spunto,-idea per accessoriare una festa in stile Colazione da Tiffany


scatole come queste in qualsiasi formato e dimensione ovunque!!! vi aiuteranno a rendere il tema molto visibile,
possono servire per contenere la bomboniera, i confetti e qualsiasi altra cosa vogliate donare ai vostri invitati.

domenica 11 settembre 2011

Arredare alla Audrey Style

"quando troverò un posto che mi fa sentire come da Tiffany comprerò i mobili e darò un nome al gatto"
Holly Golightly


la mia camera da letto!
Bhe insomma di idee ne ho trovate tante... non mi resta che trovare un grande casa dove realizzarle!!!

mercoledì 27 aprile 2011

Audrey I love you

è di madreperla dipinto a mano

la foto è stampata su ceramica
Ecco due monili che ho trovato recentemente... adorabili vero?

martedì 26 aprile 2011

look alla AudreyStyle

un look perfetto per i pomeriggi di primavera... se avete la Vespa
poi... sarete meravigliose!
Possiamo comunque andare anche a piedi: ballerine, gonna ampia, camicetta e foulard

perfetto per molte occasioni direi: in ufficio, per fare la spesa, per andare
a passeggio con i bambini...
un look semplice ed essenziale ma di grande eleganza e raffinatezza!

è lui il mio preferito!!! Holly Golightly!!!
per un occasione importante, una serata speciale, una festa, un  matrimonio...
io metterei il tacco però!

sempre  un look alla Holly Golightly, ma che può andare anche in
ufficio... gli accessori Chanel sono meravigliosi!

anche questo look è meraviglioso...
anche se in realtà Audrey vestiva Givenchy
devo dire che ballerine e pochette Chanel sono proprio azzeccate!

lo sapevate che si è sposata con un mini-abito rosa???
dopo essersi fatta confezionare un abito da sogno
dalle sorelle Fontana (e poi averlo donato ad una ragazza semplice)
sono sincera non approvo... un giorno vi mostrerò come mi sono
sposata io.... matrimonio a tema: Colazione da Tiffany


tubino nero, trench, decoltè.... eh si qualche gioiello Tiffany&Co.
posso permettermelo... quelli in argento però
lascio stare platino e diamanti, ma c'è da perderci la testa!!!

venerdì 22 aprile 2011

Eye Mask Tutorial

ho reperito le istruzioni per costruire la mascherina di Audrey in Colazione da Tiffany

Materials Needed:

Felt (a few different colors of your choice)
Soft/Silky fabric (for back side to comfort sleepy eyes)
Embroidery floss (bright colors make the best accents)
Elastic (enough to fit around your melon)
Thread
Needle
Hot glue gun
Trim – your choice (buttons, lace, bedazzles, plastic doll eyes, ribbons, etc.)
Paper (to make your patterns out of)
Pen/Pencil/Marker
Scissors
Stuffing


Okay here we go…

  1. Trace out patterns on a piece of paper. Most importantly you’ll need a large pattern for the main body of the eye mask. You can really make this as small or large as you desire. I like mine medium sized; just enough to fit over my eyes and block out enough light. I have made a large one before but it got in the way when I slept. Adorning them with too much trim can get in the way when you’re sleeping as well so be sure to keep that in mind.

You should have one main eye mask pattern, one eye lash pattern and one eye lid pattern.


  1. Take your patterns and pin them on the felt you want to use and cut them out accordingly.

You should have two main eye mask pieces (front & back), two eye lash pieces and two eye lid pieces.

You will need to cut out one more main eye mask piece from your soft/silky fabric to make three main eye mask pieces all together.


  1. Take one of your main eye mask pieces and hand sew each end of your elastic to each side of what will be the back of your eye mask. Be sure you sew this pretty strong you don’t want it popping off during your beauty rest.


  1. Now take your front main eye mask piece and glue it to the back main eye mask piece just around the edges using your hot glue gun but be sure to leave an opening for stuffing. *You do not need a lot of glue for this just enough to give some sort of hold. Plus, if you use too much glue it will make it hard to hand sew with your floss later on.

  1. This is where I start to adorn my mask but the order from this point is really up to you. I took my eye lash pieces and adorned them with sequined ribbon and then I took the eye lid pieces and adorned it with vintage gold rick-rack trim and some of my silky pink fabric. You can also put any gold trim around the entire outer piece as well to make it more like Holly Golightly’s in Breakfast at Tiffany’s.
 
  1. Take all three main eye mask pieces and make sure they are layered properly; Front pieces on top, back felt piece w/elastic in the middle and the bottom piece should be your soft/silky pieces. Pin them together and hand sew with a brightly colored (any color you desire) embroidery floss around the edges again leaving an opening to stuff it. You can use any embroidery style you want for this, I have tried a few different styles but I tend to stick with the easy ones because I am still a beginner embroiderer. Once you come to the opening you left, begin to stuff at your desired amount. *If it’s too puffy it won’t block the light out very well. Once you’re finished stuffing you can finish hand sewing with your floss to close it off. When I come to where the elastic parts are I make sure to sew through them with my floss just make sure it’s going to be super strong. The glue helps with this too.


You are now finished! There are so many different ways you can do this. I have so many ideas now just after typing this up. You can stuff them with rice, flax seed or lavender but if you do this you may want to use a cotton fabric rather than felt and sew it up with your sewing machine. There are tons of tutorials out there on the lovely Internet.
 
So who is bored to death now? (Mom wake up!!!) I know how much my mom loves crafts. For those of you who have not fallen into a deep coma from reading this I hope you enjoyed it. Please send me pics if you happen to make any of your own – I would LOVE to see them. Also, if you happen to use this tutorial on your own blog I would really appreciate some link love – but NO PRESSURE!

domenica 17 aprile 2011

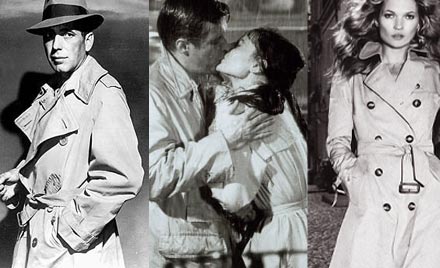
un must: il Trench


Oggi prendo in prestito un post di MartaL che parla di un capo che deve per forza essere presente nell’armadio di ognuna di noi: il trench! Ma partiamo dall’inizio.. Il trench è un tipo di impermeabile con cintura su imitazione di quello dell'esercito inglese; il suo nome viene dall'inglese "trench coat" ossia "cappotto da trincea". Nasce nel 190 quando il Ministero della Guerra inglese ne ordinò un modello alla ditta Burberry (che li produceva dal 1856). Le sue caratteristiche sono: le spalline, l'allacciatura a doppiopetto, il sottogola, la cintura, la falda triangolare sovrapposta all’allacciatura per miglior chiusura. Oggi il trench viene utilizzato da noi donne, come sinonimo di eleganza e femminilità. Credo che sia un capo evergreen, non andrà mai fuori moda ma si ripresenterà in tutte le nostre primavere.. E’ un pezzo molto versatile secondo me, che sta bene sia sopra un vestito elegante ma anche sopra un semplice paio di jeans, per dare quel tocco di raffinatezza in più. Poche di noi lo ricollegano alla sua vera origine, quella di essere un cappotto militare, ma piuttosto alle scene di molti film famosi, primo tra tutti “Colazione da Tiffany”.. Buona domenica, lovely MartaL.


A Fashionable Cookie: Trench.

il consiglio di Audrey


Questa è da attaccare sullo specchio del bagno, una delle citazioni che preferisco di Audrey. 
Quando siete giù di corda, se vi capita una giornata, una settimana o un anno difficili, ricordatevi questa frase:
"Tempo fa ho deciso di accettare la vita senza condizioni; non mi sono mai aspettata di ricevere in cambio qualcosa di speciale, eppure sembra che da allora io abbia ottenuto molto di più di quanto sperassi. Spesso le cose belle mi sono successe senza che io nemmeno le cercassi." 

lunedì 11 aprile 2011

curare l'atmosfera - i segnaposti

come dicevamo nell'articolo precedente i segnaposti sono importanti perchè rendono l'atmosfera più personalizzata e allegra, ve ne propongo alcuni originali, ma semplici da realizzare.